My Earl grey macarons are absolutely to die for. I am just living for Earl Grey flavoured desserts at the moment. Buttercream, macarons, cupcakes, you name it Earl Grey Tea is just such a dainty, delicate flavour and adds a classy aroma to any dish. You are going to fall in love with these Earl Grey Tea Macarons

What is Earl Grey Tea?
Earl Grey Tea is a tea blend made from traditional black tea and citrus oil – specifically oil of bergamot orange. The result is a black tea with a lemony citrus aroma.
The tea can be traced back to England in the mid 1800s and is thought to be named after an English politician, Charles Grey, 2nd Earl Grey.
Do you love Earl Grey Desserts too? If so, check out my recipe for Lemon Ricotta Earl Grey Cupcakes
What makes these the best Earl Grey Macarons ever?
Earl Grey Macarons are my new favorite flavor. That distinct light lemony tang paired with subtle bitterness of tea that is so distinctive of Earl Grey makes these macarons more than a little bit special. What makes this Earl Grey Macaron Recipe the best?
- Plenty of flavor: both the filling and shells are pack full of earl grey tea. This is thanks to the use of Earl grey tea leaves in the macaron shells, and infusing the ermine frosting with Earl Grey Tea.
- Easy to make: This recipe is for French macarons. No fancy equipment is needed, just an electric mixer (either a hand held or stand mixer will work).
- Light and Creamy Filling: these macarons are filled with the lightest Earl Grey Frosting ever. I could eat this frosting straight out of the bowl, it’s so good.
Tools You’ll Need
To make Earl Grey French Macarons you’ll need the following equipment:
- Electric Measuring Scales
- Bowls
- Spatulas
- Electric Mixer (either a hand held mixer, or a stand mixer fitted with the whisk attachment)
- Food Processor
- Fine Sieve
- Piping Bags
- Piping Nozzle
- Baking Tray
- Parchment Paper or a Silicone baking mat
- Toothpicks
Earl Grey Macaron Ingredients
Macaron Cookie Shells

- Egg Whites: for best results age your egg whites by placing them in an airtight container in the fridge overnight before using them. Make sure to allow the egg whites to come back to room temperature before making the meringue.
- Cream of Tartar: Without getting too technical, adding a touch of cream of tartar to your egg whites increases their acidity slightly. This helps your egg whites to whip into a nice fluffy meringue.
- Fine Granulated Sugar: Also known as caster sugar. Granulated sugar gives the egg whites structure when making the meringue.
- Almond Flour: A fine grain almond flour gives you the best chance at smooth macaron shells. Do not use Almond Meal.
- Earl Grey Tea: you can use either loose leaf of tea bags.
- Vanilla Extract
- Food Colouring (optional).
Macaron Filling Ingredients
These macarons are filled with the fluffiest light earl grey ermine buttercream frosting. To make this earl grey frosting you’ll need:
- All Purpose Flour
- Fine Granulated Sugar (also known as caster sugar)
- Milk
- Boiling Water
- Earl Grey Tea
- Salt
- Unsalted Butter
- Vanilla Extract
I’ve taken my earl grey macarons up a notch today and filled them with both the earl grey ermine frosting and a touch of lemon curd in.
If you want to follow my lea and add in lemon curd as well, you can use either store bought or home made lemon curd. Today I have made lemon curd as per the recipe on Sally’s Baking Addiction (linked below)
Sally’s Baking Addiction: Lemon Curd Recipe
How to make Earl Grey Macarons
You will fall in love with these delicious Earl Grey Macarons. All it takes is 10 simple steps.
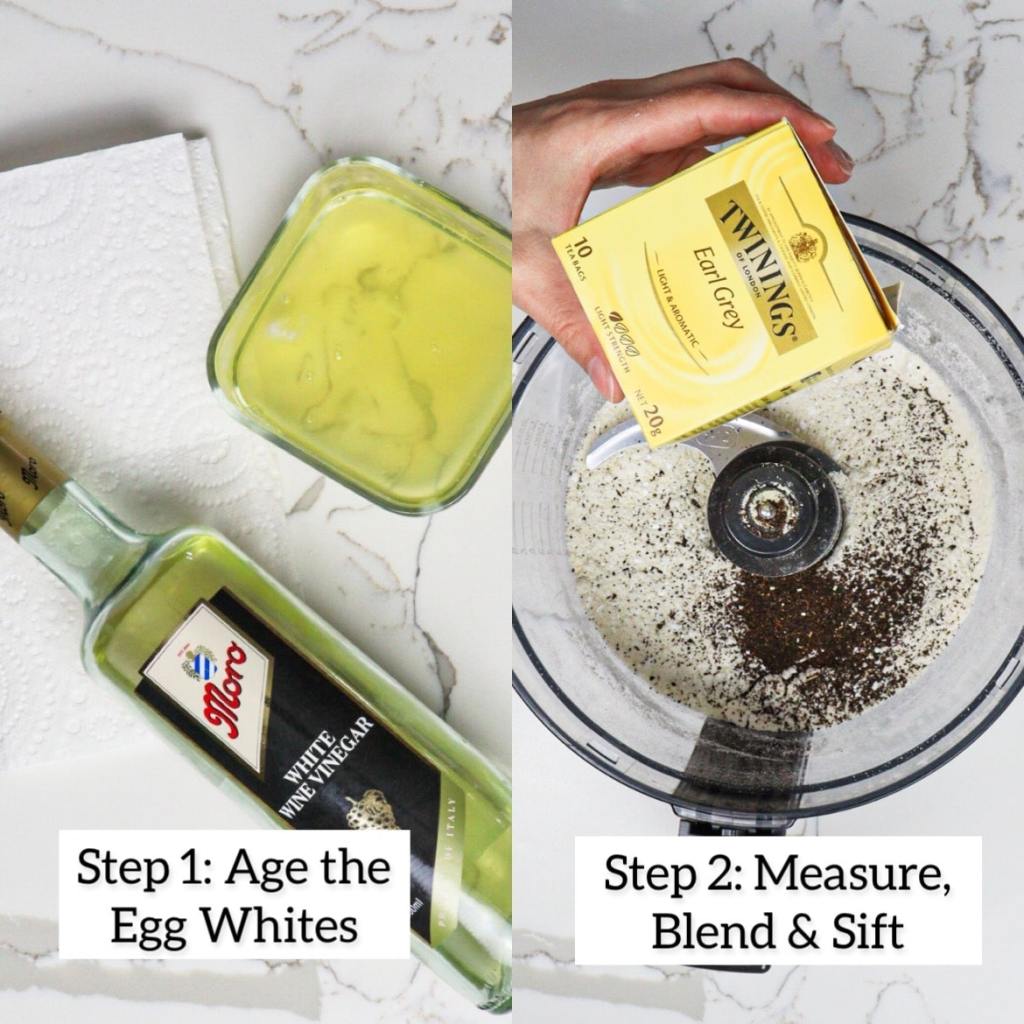
Step 1: Age the Egg Whites
Crack your eggs into a bowl that and remove the egg yolk. Transfer the egg white to a clean airtight container (that has been wiped down with a little vinegar) and store in the fridge overnight.
Step 2: Measure, Blend & Sift
Place a bowl on the scales and weigh out your almond flour and powdered sugar, and transfer to your food processor. Rip open 2 Earl grey tea bags and tip the contents into your food processor. If you’re using loose leaf tea use 2 teaspoons of loose leaf tea. Blitz on high for about 2 minutes to mix everything together and break up any large pieces.
Step 3: Make the Meringue
Place your egg whites into a clean bowl (or the bowl of your stand mixer) and whip for about a minute until they become frothy.
Add the cream of tartar and continue whipping for another minute. Next start gradually adding the sugar, one table spoon at a time, whipping well after each addition.
Once all the sugar has been incorporated, continue to whip the meringue until it reaches stiff peaks and all the sugar has dissolved.
Step 4: Fold in the Almond Flour
Add half the almond flour to the meringue and gently fold it in using a spatula. Add the second half and fold it in until all he ingredients are combined.
If you are using food colour, add it to the batter now.
Next we want to gently remove some of the air from the batter. Do do this use your spatula to gently spread the batter around the sides of your bowl. Continue doing this until the batter loosens. You want the batter to be loose enough so that if you scoop up a glob on your spatula it falls off in a ribbon shape.

Step 5: Pipe & Rest
Transfer the batter to a piping bag, fitted with a round piping nozzle. Hold the bag vertically over a baking tray that has been lined with either parchment paper or a silicone mat.
Squeeze the piping bag to push the batter onto the tray to form a round circle of batter, then release the pressure and lift your piping bag away. You now have one Earl Grey macaron cookie! Repeat this process until all your cookies are piped.
Once all the cookies have been piped, leave the tray on the counter for about 30 minutes to dry the macarons out slightly (this is called resting the macarons).
Step 6: Bake
The macarons will be ready to bake once the tops appear mat and no longer feel sticky to touch. At this point transfer the baking tray to a pre-heated oven and bake at 240F (120C) for 25 minutes.
To test if the macarons are ready try to carefully peel one off the matt. If it comes off in one piece the you’re good!
Once they are baked, leave your macarons on the baking tray to cool completely.
Be aware, all ovens are different and you know your oven best. To get the best results you may need to set the temperature 10 degrees high or lower and a slightly longer or shorter cooking time. If your oven bakes unevenly, you might also need to rotate the baking tray halfway through the baking time.

Step 7: Decorate
This is my favourite part. There are a million and one ways to decorate your macarons. Today I’m choosing to decorate these Earl grey macarons with a little drizzle of chocolate, some sprinkles and dried edible flower petals.
Step 8: Make the filling
These Earl Grey Macarons are filled with Earl Grey Ermine Buttercream. Ermine frosting is made by by cooking sugar, flour and a liquid on a stove until it becomes thick like pudding. This is then adding this to whipped butter to give it flavour and stability.
My Earl grey buttercream has a distinctive earl grey flavour because the pudding is made from Earl grey tea and milk.
Step 9: Fill
I have chosen to fill these Earl Grey Macarons with Lemon Curd as well as my Earl grey ermine frosting. To do this I pipe a circle of ermine frosting around the outside of the macaron and then pipe a dollop of lemon curd in the centre.
The ermine frosting acts as a moat to hold the soft lemon curd inside the macaron.

Step 10: Ripen
Place your assembled macarons in an airtight container and leave them in the fridge for 1-4 hours to ripen. The macaron shells will soften over this time, giving you a deliciously gooey macaron.
Macarons filled with a sturdier filling (like ganache) require more ripening time (up to 24 hours). But as these macarons are filled with soft ermine buttercream so they don’t require nearly as much time to ripen.
Troubleshooting Macarons
Macarons have a reputation for being a little temperamental. If you’ve had trouble in the past, see my macaron trouble shooting suggestions below.
Why isn’t my meringue working?
If you are finding your eggs are not forming a meringue this is likely because there is some oil contaminating the egg whites. This could be from:
- Dirty equipment
- Traces of egg yolk in the egg white
Unfortunately the only option is to throw out the egg whites and start again.
Next time, clean all your equipment with soap and water, dry it completely and then wipe it down with a little vinegar or lemon juice so that you are certain there is absolutely no oil.
Then crack a couple more eggs and carefully separate the egg white and yolks, making sure the yolks are removed in one piece.
To save time you can try skipping the ageing process.
Why aren’t my macarons rising evenly?
This could be due to a couple of culprits:
- Your oven may not heat evenly. Try rotating your baking tray halfway through the baking time.
- The surface that you are piping onto, or resting the macarons on before baking is not be flat. This would cause the macaron batter to slant while they are resting.
- You may be holding the piping bag on an angle. Be sure to hold it vertically straight up and down.
Why are my macaron shells lumpy?
If your macaron shells have a grainy surface, this could be because:
The grains of almond flour were too big.
- Check the size of your sieve (maybe get one with smaller holes). Next time blend the almond flour for longer.
- Make sure when you’re sifting the almond flour to just shake the sieve and throw out any pieces that don’t fall through (don’t push it through as this will cause larger grains to go into your batter)
There was too much air in the macaron batter. Next time mix it for a bit longer.
You can still save this batch of macarons by adding decorations to the shells such as drizzled chocolate and sprinkles to hide the grainy surface.
My macarons are not staying together?
Ermine buttercream is softer than both American Buttercream and Ganache. Make sure you refrigerate your macarons until they are ready to be served.
If you will be eating these on a hot day, consider filling the macarons with a ganache instead of ermine frosting.
Why have my macaron shells cracked?
Macaron shells crack if they are not allowed enough time to adequately rest. Make sure you leave them to rest until they feel dry to touch before putting them in the oven. The amount of time this takes will be greatly influenced by the weather on the day. This recipe recommends leaving them for 20 minutes, but this is a guide only. Make sure you check that the macaron shells are actually dry to touch before you put them in the oven.
FAQs
Storage
These macarons contain Ermine Frosting and should be refrigerated until they are served. They can be stored in an airtight container in the fridge for a few days. Alternatively if you want to make these well in advance they can be frozen. Store in an airtight container in the freezer for up to 2 months. Transfer the container from the freezer to the fridge (so that they can defrost) the day before they will be served,
Related Recipes
If you love macarons check out my other macaron recipes including:
- Fall Spiced Cranberry Macarons
- Salted Caramel Macarons
- Autumn Macarons
- Chocolate Nutella Macarons
- Lavender Macarons


Earl Grey Macarons
Equipment
- Scales
- electric mixer
- Food Processor
- A fine mesh sieve
- Piping Bags & Nozzles
- A baking tray
- Parchment Paper or a Silicone Baking Mat
- Toothpicks
Ingredients
Earl Grey Macaron Cookies
- 2 Earl Grey Teabags see notes
- Dash of Vinegar or Lemon Juice
- 100 grams Egg White
- 130 grams Powdered Sugar
- 140 grams Almond Flour
- 90 grams Caster Sugar
- 1/4 teaspoon Cream of Tartar
- 1 teaspoon Vanilla Extract
- Gel Food Colour (optional) see notes
Earl Grey Ermine Buttercream
- 4 Earl Grey Teabags
- 125 ml boiling water
- 220 grams Caster Sugar
- 50 grams All Purpose Flour
- 125 ml Milk
- 1/8 teaspoon Salt
- 250 grams Softened Unsalted Butter
Instructions
Optional Step: Age your egg whites
- For best results age your egg whites the day before you commence baking. To do this, separate egg whites from egg yolk. Place egg whites in a clean airtight container (that has been wiped down with a little vinegar or lemon juice) and store in the fridge overnight.
Prepare Equipment
- When your ready to make the macaron batter, remove egg whites from the fridge and allow to come to room temperature while you prepare the equipment & dry ingredients.
- Next prepare your baking tray & piping bag. Line baking tray with baking paper or a silicone mat, then put the baking tray to the side. Next place piping nozzle into your piping bag, and snip off the tip and also place this to the side.
- Wipe down a fresh bowl and the whisk attachment of your electric mixer with vinegar to remove any possible traces of oil.
Make Macaron Cookies
- Place the icing sugar and almond flour in a food processor. Tear open the bags of earl grey tea and pour the tea leaves into the food processor as well. Blitz in short bursts for 2-3 minutes, (stop occasionally to scrape down the sides and bottom of the food processor to make sure your blitzing the ingredients evenly.
- Transfer the dry ingredients to a fine mesh sieve and gently sift the mixture into a bowl. Discard any pieces of almond flour that do not pass through the sieve. If you are discarding a lot of almond flour weigh the amount that is being discarded and replace with the same amount of finely sifted almond flour.
- Place the egg whites into the bowl that was cleaned with vinegar/lemon juice and begin to whip on low speed using your electric mixer fitted with a whisk attachment.
- Once the eggs start to look frothy, add cream of tartar.
- Continue mixing until eggs look foamy, then gradually add caster sugar, 1 tablespoon at a time, mixing well after each addition until all the sugar has been incorporated.
- Turn the mixer up to medium-high and continue to whip the meringue until it reaches soft peaks.
- Add vanilla extract and continue whipping the meringue until it reaches stiff peaks.
- Once you have reached stiff peak stage it is time to combine the almond flour/icing sugar mixture with your meringue. You want to do this while keeping as much air in the meringue as possible. Best method to achieve this is to add half the almond flour to your meringue and gently fold in – aka use your spatula to scrape around the outside of the bowl until this first batch of almond flour has been mixed in). Then, fold in remaining almond flour using the same technique.
- Add the food colouring to each bowl, then mix it in. Gently press the batter against the side of the bowl as you mix in the food dye. Keep mixing the batter in this way until it reaches the consistency of hot lava, and falls off your spatula in a long ribbon shape.
- Once your batter is adequately mixed, transfer it to your prepared piping bag.
- Pipe your batter onto the prepared baking trays. To achieve even circles hold the piping bag straight over the tray with the tip hovering about a centimeter above the baking paper. Squeeze the bag so that the batter comes out the end, then stop squeezing and gently lift the piping bag away from the tray. If you find the baking paper is moving, you can place a dab of batter underneath the baking paper in each corner to stick it to the tray.
- Once you have piped all the macarons out, pick up your baking tray and bang it on the counter a couple of times. This will help the macarons to flatten out and encourage any air bubbles to rise to the surface.
- Check the surface of the macarons for any air bubbles. If you find any, pierce them with a toothpick, then use the toothpick to flatten out the surface of the macaron once again.
- Rest the macaron cookies by leaving the trays on the bench until the tops of the macarons feel dry to touch. The amount of time this takes will depend on the weather in your area. Where I am in Melbourne, it takes about 20mins most days. You'll know the macarons are ready to bake if they feel smooth and dry to touch.
- Preheat oven to 110 degrees. Transfer the tray of macarons to the oven. Bake at 110 degrees Celsius for 18 minutes (or a little longer if you are using a silicone mat instead of baking paper). You can check if they are cooked by gently lifting them off the paper, if they come lift up easily in one piece, then they are cooked.
- Leave the macarons on the tray until it has cooled completely, then transfer the macarons to a wire rack.
- Sort through macaron cookies to match them up into similar size/shaped pairs.
- Choose the "prettier" macaron in each pair and add any decorations you would like. You can try drizzling some melted chocolate over them and adding sprinkles or dried edible flowers.
- Once the decorations have set, place the macarons in a single layer in an airtight container. If you need to layer macarons on top of each other place a sheet of baking paper between each macaron so they don't stick together. Place this container in the fridge.
Earl Grey Ermine Filling
- Place the teabags in 125 ml of boiling water and allow them to steep for 4 minutes. Then remove the teabags so the tea does not become bitter.
- Next, place the flour, sugar & salt in a saucepan on the stove over medium heat and stir with a whisk for about 2 minutes until the flour toasts slightly.
- Add the earl grey tea & the milk a little at a time, stirring continuously with your whisk to prevent the mixture from burning at the bottom of the saucepan. Using a whisk will minimize any lumps forming.
- Add the vanilla extract and salt and continue mixing with your whisk until the mixture thickens.
- Once the mixture is thick and goopy (like custard), remove the saucepan from the heat, and transfer the mixture to a heat-proof container and allow it to cool completely.You can put this container in the fridge or freezer to speed up the cooling process, but make sure the mixture is room temperature before adding it to the butter.
- Once the pudding has cooled. Place your softened butter in a bowl and whip it up using an electric mixer until it's light and fluffy.If you are using a stand mixer, ensure that it is fitted with a paddle attachment.
- Gradually add the earl grey pudding mixture to the whipped butter, one tablespoon at a time, mixing well after each addition. Make sure each tablespoon of the mixture is incorporated before adding the next tablespoon.
- Once all the earl grey pudding and butter is combined, transfer the buttercream to your piping bags.
- Assemble the macarons straight away. Pipe the buttercream onto the underside of one macaron cookie, then place the matching cookie on top.Store in the fridge until they are ready to be served.
Notes
- If using loose leaf earl grey tea, substitute 1 teaspoon of loose leaf tea per teabag.
- If using food colouring, highly recommend using gel food colour as it is more concentrated. Liquid food may destabilise the macaron batter causing the shells to crack and hollow.